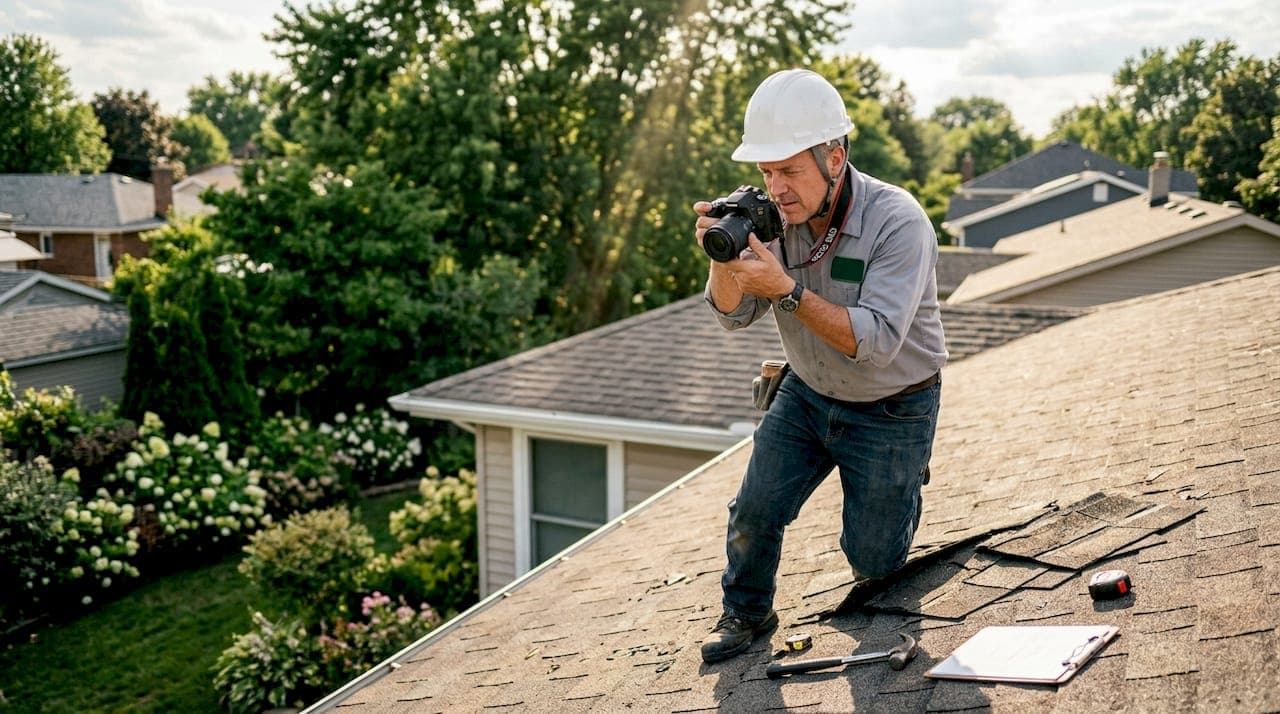
Roof repair documentation best practices are defined as the systematic process of capturing, labeling, and organizing photographic and written evidence of roof damage to support insurance claims and long-term maintenance records. The National Roofing Contractors Association (NRCA) and the International Residential Code (IRC) both recognize thorough documentation as a foundation for valid repair and replacement claims. Without organized records, homeowners risk claim denials, delayed repairs, and disputes with insurers. This guide gives you a clear, step-by-step framework to protect your home and your claim.
1. What are the essential components of effective roof repair documentation?
Effective roof repair documentation starts with a structured photo sequence. Wide-to-tight photo sequencing means capturing a wide establishing shot of the entire roof plane, a mid-range shot of the damaged zone, and a close-up of the specific defect. This three-level approach removes ambiguity and gives insurance adjusters a clear visual story.
Written descriptions must accompany every photo set. Describe damage in factual, location-specific terms. "Three missing shingles on the west-facing slope, approximately 4 feet from the ridge" is far stronger than "some shingles are gone." Objective language builds credibility with adjusters reviewing your file.

Label every photo by roof plane: north, south, east, or west. Manual labeling by roof plane is required because digital metadata can be stripped or misread during file transfers. A simple naming convention like "NorthSlope_Ridge_001.jpg" keeps your file set organized and reviewer-friendly.
Date and time stamps matter. Pair your photos with weather event data, such as a local storm report or National Weather Service alert, to establish a clear timeline. This context connects the damage directly to a covered event.
Document interior damage too. Water stains on ceilings, damp insulation in the attic, and wet drywall all corroborate exterior roof damage. Interior water damage photos are often overlooked but are critical to substantiate claims and establish the storm impact timeline.
Pro Tip: Use a smartphone with location services enabled so GPS coordinates embed automatically in photo metadata. Back up all files to cloud storage immediately after capturing them.
2. How to organize and present documentation for insurance claims
Organization is what separates a strong claim from a rejected one. Structure your files by roof section first, then by damage type within each section. A folder named "WestSlope" containing subfolders for "ShingleLoss," "FlashingDamage," and "GutterImpact" gives a desk reviewer a logical path through your evidence.
Create a damage log. This is a simple document, even a spreadsheet, that links each photo filename to a specific finding, location, and date. A damage log turns a folder of images into a coherent narrative. Adjusters process dozens of claims at once, and a log that does the cross-referencing for them speeds up your approval.
Include supplemental materials alongside your photos and log:
- A professional inspection report from a licensed roofing contractor
- Repair or replacement estimates with itemized line items
- A local weather report or storm event record matching your damage date
- Manufacturer guidelines for the roofing materials installed on your home
- Building code references relevant to your repair scope
Claims that reference building codes and manufacturer guidelines receive faster approvals and fewer disputes. Write a one-page cover letter summarizing the damage, the event date, and the code or guideline references that apply. This positions your claim as thorough and professionally prepared.
Avoid the most common organizational mistakes. Random, unsequenced photos with no labels create confusion and give adjusters a reason to question your claim. Digital files without backups risk total loss if a device fails.
Pro Tip: Print a physical copy of your damage log and photo set as a backup. Some insurance carriers still process paper files, and a printed set shows preparation and seriousness.
3. What roof repair documentation methods improve insurance claim success?
Certain documentation methods consistently produce better claim outcomes. Apply these practices every time you document roof damage:
- Use wide-to-tight photo sequencing. Insurers prioritize context, and photos showing the full slope, the damaged zone, and the specific defect prevent rejection due to ambiguous evidence.
- Write objective, factual observations. State what you see, not what you conclude. "Granule loss exposing mat substrate on south slope" is factual. "The roof is ruined" is not.
- Include interior damage. Ceiling stains, wet insulation, and damp walls directly link exterior roof damage to interior impact, which strengthens the timeline of a covered event.
- Use technical language. Terms like "ridge cap displacement," "step flashing separation," and "valley membrane exposure" align with insurance industry vocabulary and signal a credible, informed claimant.
- Document immediately after a storm. Delays weaken claims because new weather events can obscure or add to existing damage, making it harder to isolate the original cause.
- Get a professional inspection. Professional inspections reduce misdiagnosis risk and confirm whether damage requires repair or full replacement. A licensed inspector's report carries weight that homeowner photos alone cannot match.
Combining your own thorough documentation with a professional assessment gives your claim the strongest possible foundation. Chattanoogaroofrepairs conducts comprehensive 21-point inspections that produce the kind of detailed, organized reports insurers expect.
4. What common mistakes undermine roof repair documentation?
Documentation errors are the leading reason insurance claims stall or get denied. Recognizing these mistakes before you submit protects your claim and your timeline.
- Random, blurry, or unlabeled photos. Structured narratives documenting "missing shingles on the west-facing slope" outperform disorganized photo piles every time. Blurry images are dismissed outright.
- Skipping interior water damage. Exterior photos alone do not prove a storm caused interior impact. Ceiling stains and wet insulation are the evidence that closes that gap.
- Vague or subjective damage descriptions. Phrases like "bad damage" or "looks terrible" carry no weight with adjusters. Specific, location-based language is the standard.
- Delaying documentation. Waiting days after a storm allows secondary damage to accumulate and blurs the original event timeline. Document within 24 hours whenever safely possible.
- Omitting weather event data. A photo without a corresponding storm record is just a photo. Attach a National Weather Service report or local news record to every claim file.
- Failing to organize by roof plane. Industry best practices require organizing photos by slope, ridge, valley, and eave so reviewers can navigate your evidence without guesswork.
Industry standards advise biannual roof inspections and immediate post-storm assessments. Detailed maintenance records prove regular upkeep, which separates sudden storm damage from long-term neglect in the eyes of an insurer. That distinction directly affects whether your claim gets approved.
Knowing when repair costs approach replacement thresholds also shapes your documentation strategy. Minor repairs typically cost $150–$1,500, while replacements run $3,500–$12,000 per 1,000 square feet. When repair costs approach 25–40% of replacement cost, your documentation should shift toward justifying a full replacement claim.
Key Takeaways
Thorough, organized roof repair documentation is the single most effective way to protect your insurance claim and your long-term maintenance record.
| Point | Details |
|---|---|
| Use wide-to-tight photo sequencing | Capture wide, mid-range, and close-up shots for every damaged area to remove ambiguity. |
| Label photos by roof plane | Name files by slope direction (north, south, east, west) since digital metadata can be lost. |
| Include interior damage evidence | Ceiling stains and wet insulation corroborate exterior damage and establish the storm timeline. |
| Reference building codes in your claim | Claims citing code and manufacturer guidelines receive faster approvals and fewer disputes. |
| Document within 24 hours of a storm | Prompt documentation isolates the original damage before secondary events complicate the record. |
What I've learned from years of watching homeowners handle roof claims
Most homeowners treat documentation as an afterthought. They grab their phone, snap a few photos from the ground, and assume that is enough. It almost never is. What I have seen consistently is that the claims that move quickly and get approved fully are the ones where the homeowner treated their roof like a crime scene: methodical, labeled, and fully narrated.
The single biggest mistake I observe is skipping the interior. Homeowners focus entirely on the roof surface and forget that a water stain on a second-floor ceiling is some of the most powerful evidence in a claim file. Adjusters know that interior damage does not appear without a roof breach. That photo of a wet attic rafter connects the dots in a way that no exterior shot can.
I also want to push back on the idea that professional inspections are optional. They are not. A licensed inspector catches systemic issues that a homeowner with a smartphone will miss, such as compromised decking beneath intact shingles or flashing failures that look fine from the outside. Pairing your own detailed damage photos with a professional report is the combination that wins claims.
The homeowners who struggle are the ones who wait. They think the damage is minor, they delay, and then a second storm hits. Now the claim timeline is muddied and the insurer has grounds to question what caused what. Document fast, document thoroughly, and organize before you submit.
— Steve
Chattanoogaroofrepairs: professional support when your roof needs it most
When storm damage hits, having a trusted local team makes the documentation and repair process far less stressful. Chattanoogaroofrepairs specializes in storm and hail damage repair across Chattanooga and surrounding areas, with same-day tarping available to prevent further damage while your claim is processed.
Chattanoogaroofrepairs uses GAF and Owens Corning materials and provides comprehensive 21-point inspections before and after every repair. That inspection report becomes part of your insurance documentation package, giving your claim the professional backing adjusters look for. Transparent pricing and no-pressure assessments mean you get honest answers, not upsells. Reach out to schedule your roof inspection and repair today.
FAQ
What photos should I take for a roof insurance claim?
Capture wide shots of each roof plane, mid-range shots of the damaged zone, and close-ups of specific defects. Organized photo sets by roof slope improve claim clarity and reduce adjuster questions.
How soon should I document roof damage after a storm?
Document within 24 hours whenever it is safe to do so. Prompt documentation isolates the original damage before secondary weather events complicate your claim timeline.
Do I need a professional inspection for my insurance claim?
A professional inspection report significantly strengthens your claim. Licensed inspectors confirm damage scope and catch issues that homeowner photos alone may miss, reducing the risk of a disputed or underpaid claim.
Should I document interior damage as part of my roof claim?
Yes. Interior water stains, wet insulation, and damp drywall directly link exterior roof damage to a covered storm event. Skipping interior documentation is one of the most common reasons claims are questioned or reduced.
How do I organize my roof repair documentation for an adjuster?
Create folders by roof section, link each photo to a written damage log, and include a cover letter referencing building codes and manufacturer guidelines. Claims with technical references move through the approval process faster and with fewer disputes.